Saturday, November 10, 2018

Skillet Breakfast Hash


Perfect for a cold morning!

This recipe requires one large baked potato that is baked a day or two ahead and refrigerated.  I usually make this after we've had stuffed baked potatoes for dinner the previous night.  I just bake 1 extra potato and stick it in the fridge until the next morning.

Here's what you need:

2 tablespoons olive oil
1 medium diced onion or 1 (12 oz.) bag frozen diced onions 
1 large refrigerated baked potato, diced
1 pound ground breakfast sausage, browned/crumbled 
Cream gravy (packaged, or make your own) (optional)
Salt & Pepper
Grated cheese (cheddar, or your preference)

Begin by adding the olive oil, onions, and salt and pepper to a non-stick skillet.  

Cook on medium high heat until the onions soften and just begin to brown some.

While the onions cook, brown the sausage, set aside.


Then dice the potato.


Remove the skin if you prefer.


Add the potatoes to the onions and stir.  Allow to cook on medium high to high heat until the potatoes are browned to your liking. 

Add the sausage, stir, and continue to cook.....


Until it looks like this.  You could use smoked sausage or diced ham instead of ground breakfast sausage if you prefer.


This step is optional, you could skip it but my husband likes it, so I always add it.  Make a cream gravy and pour over the top, don't stir.  Cover and reduce the heat to low.  


If I'm in a hurry, I use this gravy mix.  If I'm not, I make my own gravy from the sausage drippings.


Sprinkle grated cheese over the top of the gravy and cover.  Allow to cook on low heat until the cheese melts.


Grab a fork and dig in! 


Thursday, July 12, 2018

Cook Once, Eat Twice!


Today, it rained... and rained.... and rained.  I love rain.  I love the sound of thunder.  What does that have to do with cooking?  Well, it was really pouring today and I didn't want to get out in it.  I was thinking this morning how glad I was that I decided to grocery shop yesterday and not today. So... I decided to turn off the air conditioner, open the windows, open the patio door, and get to cooking.

And cook, I did.  Sometimes the mood just hits me and this was one of those days and I have a busy week coming up, so I'll be glad I decided to do this later!

I started out by getting a chuck roast into the crock pot, loaded with lots of flavorful gravy.  I'm adding carrots and baby gold potatoes and onion to it.  I'll serve it up like that the first time, then with the leftovers, I'll cut the meat and veggies into smaller pieces and make some hand pies with it later in the week.

While the roast was cooking away, I made a pot of spaghetti sauce that will be served with pasta the first time and then later, I'll use it in a cast iron skillet deep dish pizza.

Then I cooked a double batch of taco meat, which will first be used for tacos and then later I'll make some nice taco salads with the leftovers.

So that takes care of 6 meals, and that means with minimal prep I will have dinner served up in a flash for six days.  I think on day 7 I'll be dining out, and if I know me, it may well be breakfast, which is one of my favorite things to have for dinner!


Sunday, July 1, 2018

Easy Cinnamon Quick Bread


Getting tired of cinnamon-based recipes isn't something that happens to me.  I really like cinnamon!  I have multiple recipes for cinnamon quick breads, but here's a simple one that's moist and delicious.  It makes 2 loaves.


For the batter:

1 cup salted sweet butter, softened to room temperature
2 cups granulated white sugar
2 eggs at room temperature
1 teaspoon pure vanilla extract
2 cups buttermilk (or 2 cups milk plus 2 tablespoons vinegar or lemon juice)
4 cups flour
2 teaspoons baking soda
1/8 teaspoon salt

Optional:  1/2 cup finely chopped pecans


Cinnamon/sugar mixture: (divided use)

1 cup sugar

1 tablespoon plus 1 teaspoon ground cinnamon 


Directions:
In a large bowl, combine butter, 2 cups of sugar, beat until smooth:


Combine the flour, baking soda, and salt and stir together in a separate large bowl:


In a medium sized separate bowl, combine 1 cup of sugar and the cinnamon and stir well, set aside.  

I don't actually measure the sugar and cinnamon, I just prepare a bowl of it.  I use more than the recipe calls for, since I also coat my pans with it.  Plus, I just like MORE!!!


Combine the eggs, buttermilk and vanilla extract together in yet another bowl, whisking together well.

Add the egg mixture to the butter mixture, one half at a time and beat until smooth.
Then add half the flour mixture to the liquid ingredients and beat until smooth, scraping the sides and bottom of the bowl.  Add the remaining flour mixture and beat again until smooth and scrape down the bottom and sides of the bowl again.
The batter will be thick, and should be smooth, like this:


Spray the two loaf pans generously with butter flavored non-stick cooking spray and spoon 2 heaping tablespoons of the cinnamon/sugar mixture into each pan.  Swirl to coat completely. Use as much of the cinnamon/sugar mixture as necessary to coat completely, and empty any excess remaining in the pans back into the original sugar/cinnamon mix bowl. You can add a teaspoon of flour to the coating mixture if you wish, but I never do and they never stick if you don't leave them in the pan for more than 8 to 10 minutes before you turn them out. OR... just flour them if you want, but the cinnamon/sugar method is awesome! The original recipe calls for just the spray and flour.


Once the pans are coated, they should look like this:


Spoon 1/2 of batter (1/4 of it for each pan) into the loaf pans and gently spread to cover the bottom evenly: 


Using about half of the remaining cinnamon/sugar mixture, sprinkle it over the top of the batter.  (add the finely chopped pecans here if you are using them... just sprinkle them evenly over the sugar layer):  If you're like me and want to go heavier on the cinnamon/sugar mixture, make more!!!


Divide the remaining batter between the two pans, using half of it in each; gently spread evenly, and then sprinkle each with half of the remaining cinnamon/sugar mixture:


Using the handle of a wooden spoon, a butter knife, a chopstick, a skewer... or whatever you want to use, lightly swirl the tops of each loaf pan.  Don't get all the way to the bottom of the pan when you do this, just go about half way in:


Bake on the center rack at 350 degrees for about 45 to 50 minutes, or until a tester comes out clean.  All ovens vary, so start checking at around 40 minutes to avoid over-baking, which will deplete moisture.  


After removing from the oven, allow to cool at room temperature for 8 minutes, then before attempting to remove the loaves from the pan, shake them side to side until you see the loaves release.  

You could stop there, but I never do... here's what I like to do next, but you don't have to do this.... 

I like to brush the tops generously with melted butter and then sprinkle more cinnamon/sugar mixture over the top while they are still warm:


Then turn them out and place on a wire rack to cool completely before wrapping in foil. 

Here's what you end up with to enjoy!!


Note:  Sometimes I pour a thin layer of melted butter over the center batter in the pan before I sprinkle the cinnamon/sugar mixture onto it and add the rest of the batter on top.  I like what it does... adds a little moisture and makes the mixture taste even better!  The recipe doesn't say anything about that....

Nothing wrong with having a slice of this anytime at room temperature, but it's so good with butter spread on top and warmed in the microwave for about 20 seconds, and it's great with coffee too!

Wednesday, June 27, 2018

Triple Decker Egg-in-the-Hole Grilled Cheese Sandwich


Egg-in-the-hole is one of my husband's favorite breakfast choices, so I decided to combine it with another one of his favorite things - grilled cheese sandwiches.  Needless to say, he had absolutely no objections when I told him I was going to do this!

It's easy, quick, and satisfying!  Here's how I did it:

Note:  This recipe is best made on a griddle, either over your burners or an electric one.


Ingredients:

3 pieces sliced sandwich bread, wheat or white
1 egg
1 stick cold butter ( you will use a portion of it)
2 slices medium cheddar cheese
2 slices pepper jack or swiss cheese (or heck, any cheese you want to use)
Salt and pepper, to taste

Directions:

With one of the three pieces of bread, use a biscuit cutter, drinking glass rim, or cookie cutter to cut a circle out of the center, being sure to leave at least a ½ inch space on all four sides of the circle. 


Tear 2/3 of the wax paper wrap off the stick of cold butter.


Heat griddle to medium high. On an electric griddle, set to between the 3 and 4 settings.  If you notice the butter beginning to brown on the griddle, reduce the heat a little.


Holding the stick of butter by the end that still has the wrapping on it, carefully rub the opposite end of it directly onto the griddle, creating an area of melted butter, enough to butter one side of all three bread pieces.  


Place all three slices of bread onto the melted butter on the griddle.

Melt an additional little puddle of butter directly into the hole, then crack the egg into it and cook until you can see the egg white solidifying on the bottom side.  


Salt and pepper the egg to your liking, then carefully flip the two regular pieces of bread, as seen in the next picture, which should be lightly toasted. 


Next, put 2 slices of cheese on each of the pieces of toast without egg. 
Then lift the egg-in-the-hole with a spatula and flip it, allowing the egg to cook on the other side.  As the egg cooks, check the two pieces of toast with cheese on them to make sure they don’t get too dark.  You can remove them from the griddle onto a plate until the egg is done if necessary, to prevent them from over-browning and once the egg is done, return them to the griddle.


When the egg is done, lift the egg-in-the-hole toast and place it on top of the cheese layer of one of the other pieces of bread on the griddle with a spatula.


Top the egg-in-the-hole with the other piece of bread, cheese side down, so that the egg-in-the-hole becomes sandwiched between the cheese layers. 
Turn sandwich over with a spatula, flipping as needed to finish both sides toasted to your preference. 


Serve hot, right off the griddle.


My husband likes his egg yolk runny, so this was just right for him!


This is a hearty, satisfying grilled cheese sandwich that can be enjoyed any time of the day.  If I had been making this for me, I would have use my favorite Orowheat Healthnut bread and added lots of crispy bacon!  You could change the cheeses and other ingredients up just about any way you want no matter what time of day you want to eat it!  My husband really enjoyed this thing!  Success!


Wednesday, January 24, 2018

The Ultimate Chocolate Peanut Butter Pie


What's not to love about the classic combination of chocolate and peanut butter?  Here's a doozie of a pie that combines them in the ultimate way!  I developed this recipe for a Valentine's Day contest entry. The only baking time required for this is a quick little pre-bake of the crust.

A recipe for peanut butter chocolate chunk cookies won the contest, not my pie, but my husband says it's a winner as far as he's concerned, so here it is and if you try it, I hope you enjoy it as much as we do!


Ingredients:

Crust:

Non-stick cooking spray

6 chocolate Oreo cookies  

10 Nutter Butter cookies

4 tablespoons butter, melted

Filling:

3/4 cup creamy peanut butter

1 (8 oz.) package cream cheese, softened to room temperature

1 (7 oz.) jar marshmallow crème

1/2 cup powdered sugar

1 (8 oz.) container Cool Whip, thawed

6 Reeses Peanut Butter Cups, cut into quarters

Topping:

1/2 cup dry roasted peanuts, chopped (regular or honey roasted)

Chocolate syrup

 3 Reese's Peanut Butter Cups, whole

Let's make this thing!!!


Using a food processor, combine and process all cookies together into a fine crumb (makes about 2 ¼ cups of crumbs). Pour crumbs into a medium bowl.

Add melted butter and mix with a fork until all crumbs are moistened.

Spray a 9 inch, deep dish pie plate lightly with non-stick cooking spray and press crumb mixture evenly into bottom and sides of it.  Bake at 350 degrees for 7 minutes, remove from oven and allow to cool completely. While cooling, begin making the filling.

Here's the pre-baked crust, ready to fill with the good stuff!!


For the filling, beat the peanut butter, cream cheese, marshmallow crème, and powdered sugar together with a hand or stand mixer until smooth (about 2 minutes), and then add the Cool Whip and beat again until smooth. Scrape sides and bottom of bowl and stir.


 Pour half the filling into the cooled crust, spreading evenly on top with a butter knife or the back of a spoon.


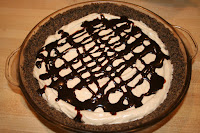
Drizzle with chocolate syrup in a criss-cross fashion over the filling (Ghirardelli is my favorite brand), then cut 6 of the 9 peanut butter cups into quarters as seen below.


Gently press the quartered pieces into the surface of the filling/chocolate until the top of them is even with the top of the filling.  


Top with remaining filling and spread evenly again. 


Drizzle more chocolate syrup over second layer of filling as before.


 Put about 1/4 cup roasted peanuts in a zip lock bag and crush them.


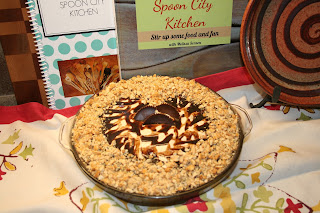
Sprinkle the peanuts all the way around the outer edge of the pie, leaving the center with no peanuts, but with the chocolate syrup drizzle showing. 

Place the three remaining peanut butter cups into the center of the pie by turning them sideways and pushing them almost halfway into the pie, in a decorative fashion.


Chill for at least 4 hours before serving.

I'm telling you, if you like chocolate and peanut butter together, and especially if you like Reese's Peanut Butter Cups, you're going to love this pie!  I'm diggin' in!!